Test Altospam’s solutions!
Thousands of companies, CTOs, CIOs, CISOs and IT managers already trust us to protect their e-mail against phishing, spear phishing, ransomware, …

We always make sure that Altospam is optimally configured to guarantee a high-performance service. Recipient filtering must be correctly configured, as it is important not to generate unnecessary traffic. As 2016 draws to a close, we’re offering a configuration of Exchange 2013 and 2016 servers without an EDGE server. To fully understand the benefits of setting up recipient filtering, please consult this article.
> Configuring recipient filtering on Exchange 2013 or 2016 with an EDGE relay server
![]() This quick setup can be used if your Exchange mail server uses a default configuration. Start by opening Exchange Management Shell, symbolized by the logo opposite. Then enter the following commands:
This quick setup can be used if your Exchange mail server uses a default configuration. Start by opening Exchange Management Shell, symbolized by the logo opposite. Then enter the following commands:
Step 1:
& $env:ExchangeInstallPathScriptsInstall-AntiSpamAgents.ps1
Enable-TransportAgent "Recipient Filter Agent"
Set-RecipientFilterConfig -RecipientValidationEnabled $true
Set-RecipientFilterConfig -Enabled $true
Step 2:
Get-AcceptedDomain | ? {$_.AddressBookEnabled -ne "True"} | Set-AcceptedDomain -AddressBookEnabled $true
Step 3:
Set-SenderFilterConfig -Enabled $false
Set-SenderIDConfig -Enabled $false
Set-ContentFilterConfig -Enabled $false
Set-SenderReputationConfig -Enabled $false
Then execute the following commands one by one (requires confirmation):
Disable-TransportAgent "Sender Filter Agent"
Disable-TransportAgent "Sender ID Agent"
Disable-TransportAgent "Content Filter Agent"
Disable-TransportAgent "Protocol Analysis Agent"
Step 4:
Get-ReceiveConnector "Default $env:computername" | Set-ReceiveConnector -PermissionGroups AnonymousUsers, ExchangeUsers, ExchangeServers, ExchangeLegacyServers
Restart-Service "MSExchangeTransport"
Step 5:
Modify the NAT translation on your firewall to redirect the incoming TCP/25 port to your mail server’s TCP/2525 (see details in step 6 of the next chapter below).
![]() In this section, we’ll describe the configuration to be set up. Start by opening Exchange Management Shell, symbolized by the logo opposite. Then enter the following commands:
In this section, we’ll describe the configuration to be set up. Start by opening Exchange Management Shell, symbolized by the logo opposite. Then enter the following commands:
Step 1: Installing the Exchange anti-spam agent
To do this, issue the following command:
Get-TransportAgent
It displays a summary list of all transport agents installed on all Exchange servers in your organization.
You should get this result:
![]()
The ” Recipient Filter Agent ” item must appear in the list and be set to ” True “. If not, enter the following commands to install the Exchange antispam module and enable recipient filtering:
& $env:ExchangeInstallPathScriptsInstall-AntiSpamAgents.ps1
Enable-TransportAgent "Recipient Filter Agent"
Set-RecipientFilterConfig -RecipientValidationEnabled $true
Set-RecipientFilterConfig -Enabled $true
Step 2: Activate recipient filtering
Enter the command :
Get-AcceptedDomain | Format-List Name,AddressBookEnabled
This command displays the name(s) of your organization’s domain(s), but also shows whether recipient filtering is enabled.
The AdressBook element must be set to ” True “. If this is not the case, you must activate it (ONLY on the authoritative domain(s)):
Set-AcceptedDomain nom_du_domaine -AddressBookEnabled $true
If all domains are authoritative, you can run this command to activate them all at once:
Get-AcceptedDomain | ? {$_.AddressBookEnabled -ne "True"} | Set-AcceptedDomain -AddressBookEnabled $true
Step 3: Deactivate other filters
The aim of this step is to disable Exchange’s other anti-spam services to avoid serializing anti-spam and generating false positives. Enter these 4 commands:
Set-SenderFilterConfig -Enabled $false
Set-SenderIDConfig -Enabled $false
Set-ContentFilterConfig -Enabled $false
Set-SenderReputationConfig -Enabled $false
Then one by one, the following commands (Requires confirmation):
Disable-TransportAgent "Sender Filter Agent"
Disable-TransportAgent "Sender ID Agent"
Disable-TransportAgent "Content Filter Agent"
Disable-TransportAgent "Protocol Analysis Agent"
Then enter the command :
Get-TransportAgent
You should get this result:
![]()
Step 4: Changing the default receive connector
The command below allows you to authorize anonymous users, which is necessary to be able to send you emails on this connector.
Get-ReceiveConnector "Default $env:computername" | Set-ReceiveConnector -PermissionGroups AnonymousUsers, ExchangeUsers, ExchangeServers, ExchangeLegacyServers
At the end of these 5 steps, you need to restart the :
Restart-Service "MSExchangeTransport"
In some cases, this command may display an error due to certain dependencies on the Exchange transport service. In this case, you’ll need to restart the service manually.
This configuration is also possible via the graphical user interface, which can be used to check that the configuration has been applied correctly. To do this, proceed as follows:
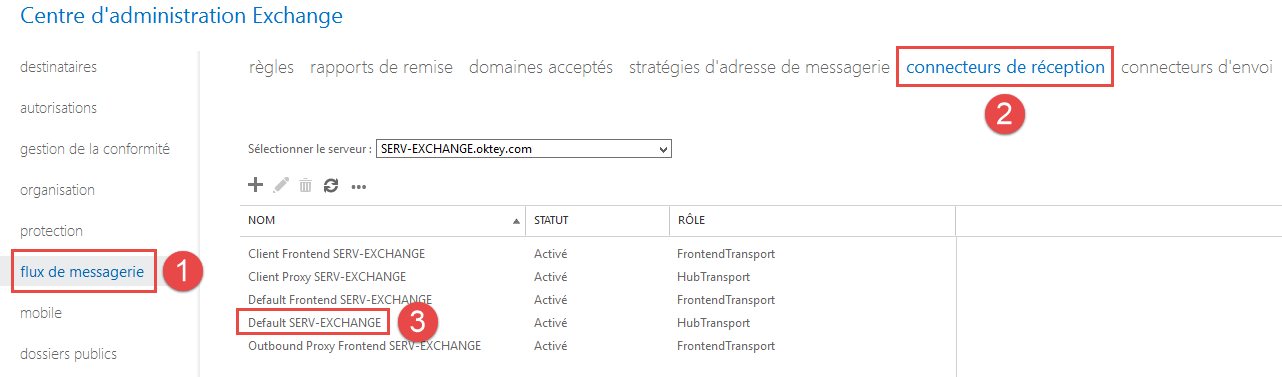
Go to the Exchange Administration Center, go to the Mail Flow section (1), then to the Inbox Connectors tab (2), and double-click on “Default Server_Name” (3).
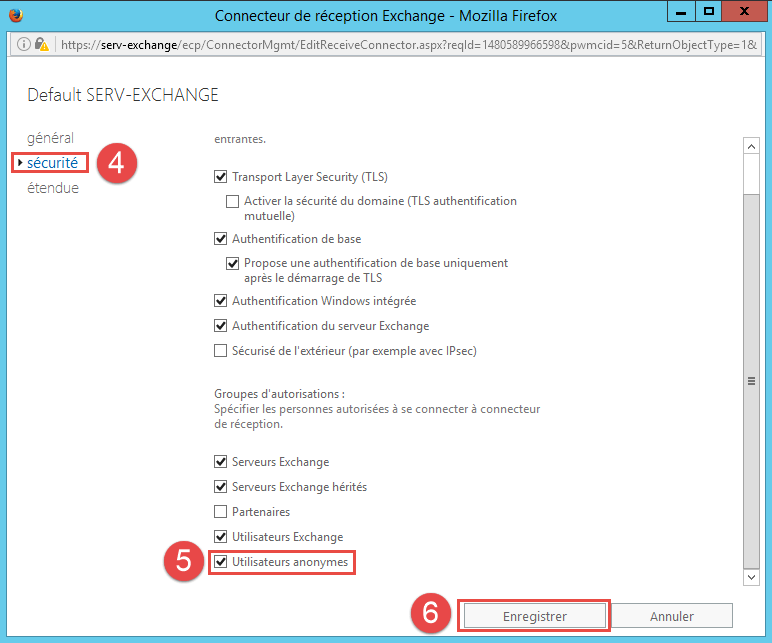
Go to the security section (4), check the Anonymous users box (5) and save the change (6).
Step 5: Port 2525 redirection
The configured Exchange connector listens on port TCP/2525, so traffic must be sent to this port.
You must therefore redirect port 25 to port 2525. In the firewall: modify NAT to redirect port 25 to 2525 and authorize it in the firewall. If you don’t want to do the translation on your firewall, contact us so that we can forward your flow to port TCP/2525. Remember also to filter the SMTP flow only from ALTOSPAM addresses.
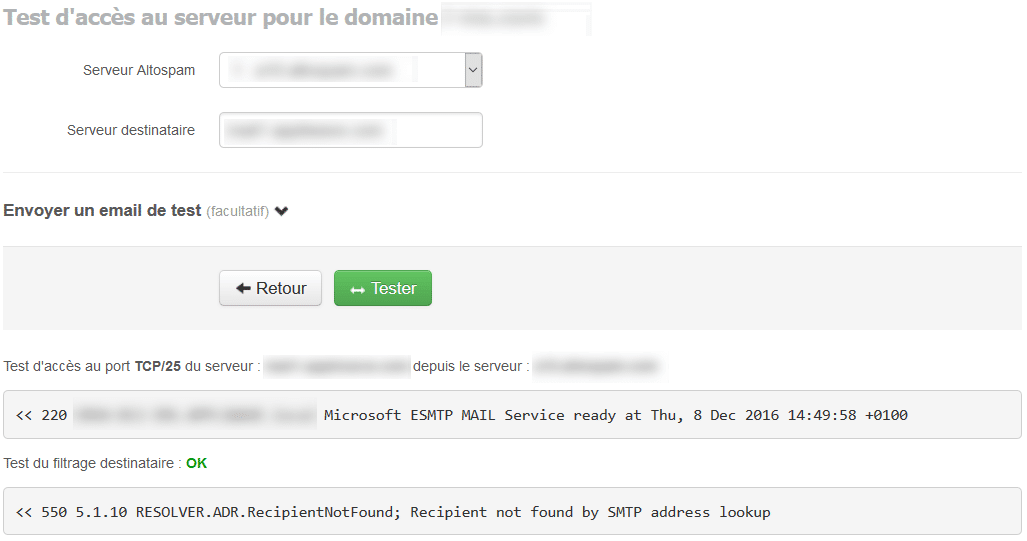
Check that recipient filtering is working: Once logged into your customer administration interface, click on the “Technical” menu, then on the ![]() logo, named “Test mail server”. Once you’re on the page, you can launch the test directly, which will not only check access to your server, but also test your recipient filtering.
logo, named “Test mail server”. Once you’re on the page, you can launch the test directly, which will not only check access to your server, but also test your recipient filtering.
Setting up recipient filtering is very important to avoid generating bounces, for example. If you have Exchange 2003, the procedure is different, as described in our article: Recipient filtering on Exchange 2003. The one for Microsoft Exchange 2007 and Microsoft Exchange 2010 servers is described in the article: Configuring Exchange 2007 and 2010 for recipient filtering. If you use other types of mail servers such as Lotus, Postfix, Exim, Qmail… don’t hesitate to contact Altospam support.
Test Altospam’s solutions!
Thousands of companies, CTOs, CIOs, CISOs and IT managers already trust us to protect their e-mail against phishing, spear phishing, ransomware, …