Test Altospam’s solutions!
Thousands of companies, CTOs, CIOs, CISOs and IT managers already trust us to protect their e-mail against phishing, spear phishing, ransomware, …
Altospam’s integration with 365 increases the security of your 365 online message, thanks to the compatibility and complementarity of the two services, as described in thefollowing article. This procedure enables you to optimize the configuration of Microsoft Exchange Online with Altospam to ensure the best possible email processing and interoperability between the two systems. This procedure consists of 3 phases: activation of recipient filtering, connection filtering and deactivation of 365 filtering to avoid false positives.
Article updated January 22, 2022
Note: Our customers can refer to the detailed procedure available here (after logging in to their management area).
Here is a simplified procedure for other users:
It is essential to create a Partner connector and add the IP address of your MX servers to it. This addition ensures that e-mails sent from Altospam servers will not be blocked by your mail server.


Check that the box Reject mails if not sent using TLS is ticked, then Next, Check that all the information is correct, then click on Create a connector.
Check that the connector is active: the checkbox must be ticked if not.
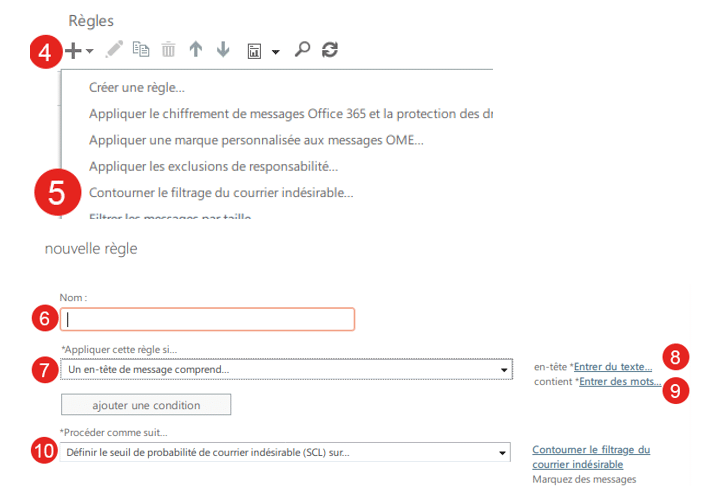
To prevent e-mails from being placed in the “junk mail” folder, please follow the procedure below.
Click on the menu Home, Show all, Exchange. In this new Exchange section, click on the Home menu , then Mail Flow, then Rules . Then create a rule as follows:
We’re going to activate recipient filtering on 365 so that the exchange of accounts between Altospam and 365 runs smoothly.
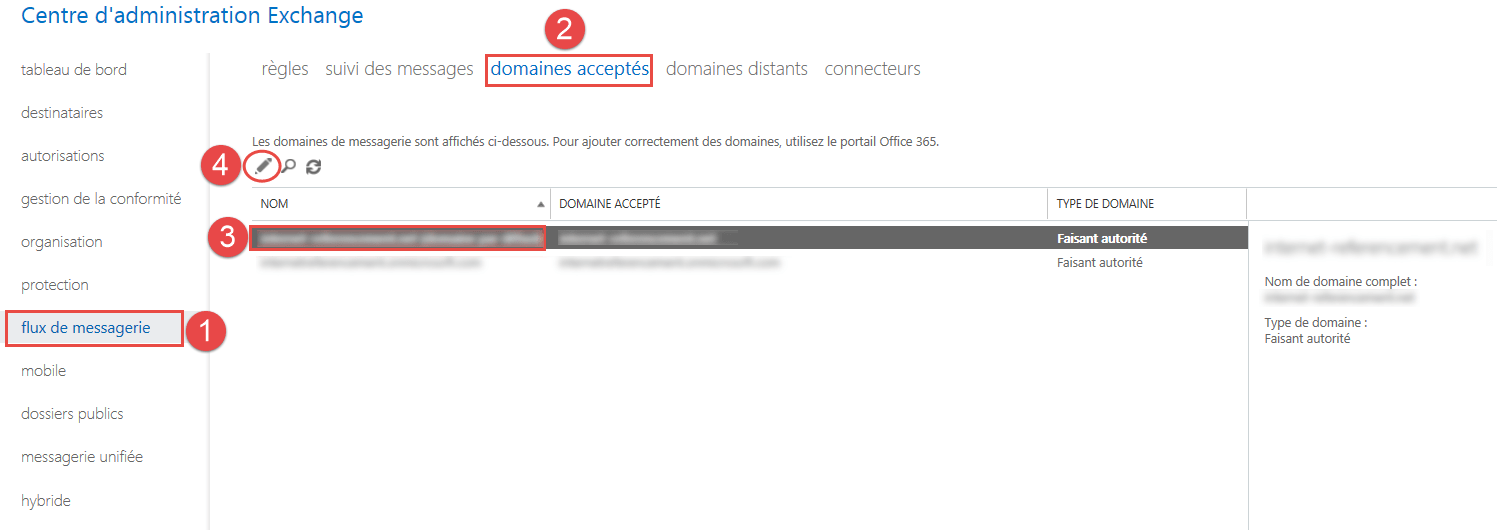
Go to the Exchange Administration Center (EAC) interface, then in the “Mail flow” section (1), select the “Accepted domains” tab (2). Select your domain (3), click on the pencil icon (4) and choose the “authoritative” option (5).
 This option can be chosen if and only if all the email addresses in your domain use Office 365. If you are in the process of migrating, recipient filtering cannot be activated.
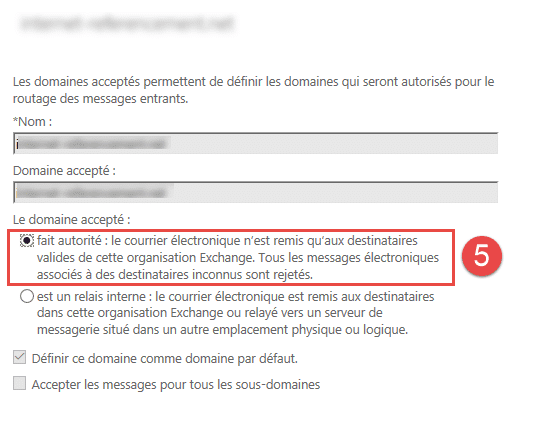
 Due to a bug, you need to click on the “Save” button, otherwise the change will not be validated, even if the option is already selected.
To force 365 to authorize all emails coming from Altospam servers, you need to add the IP addresses of Altospam servers to the “connection filter”.
Altospam server IPs can be retrieved by simply pinging the MX servers associated with your domain. You can also view them using our tool: https: //www.altospam.com/outil/

Go to the “Protection” section (1) and open the “Connection filter” tab (2). Select “Default” (3) then click on the pencil icon (4). Then go to the “Connection filtering” tab (5). Click on the + icon (6) in the authorized IP address section (7), and add the IP addresses of the Altospam servers (as seen above).

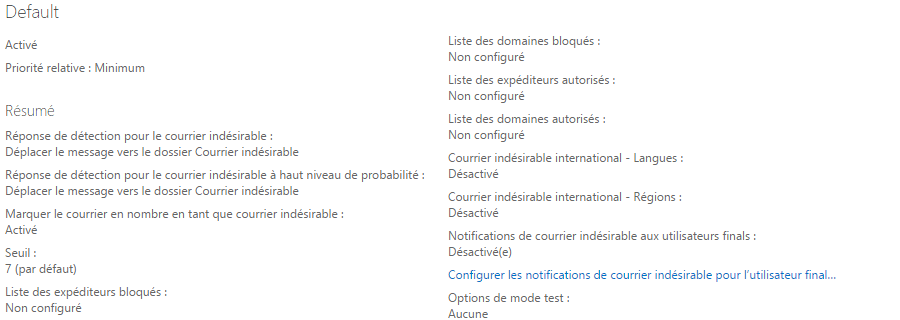
To avoid false positives generated by Microsoft, it’s wiser not to serialize anti-spam software, i.e. to disable 365’s filtering options. Still in the “Protection” section, select the “Spam filtering” tab and double-click on “Default”. You must ensure that the red and green lists are not configured (no domains or IP addresses added). In the “international junk mail” section, the filtering options must be unchecked. To complete the deactivation of spam filtering, check in “advanced options” that everything is set to Deactivated.
Normally, once you’ve taken the necessary steps and followed points 1 to 3 of this procedure, recipient filtering should be active and all emails should arrive perfectly fine.
End of Standard procedure. The following points should only be read in the event of a problem.
——
If you are still having trouble receiving your emails through 365 despite having implemented the above procedure, please read on:
You still get blocked messages from Microsoft or emails that arrive as Junk Mail. We advise you to install a specific connector. This is more powerful than simply whitelisting our IPs.
Once logged into your Office 365 interface, access your “Exchange Administration Center”. Click on “Mail flow” in the left-hand menu, then select the “Connector” tab.
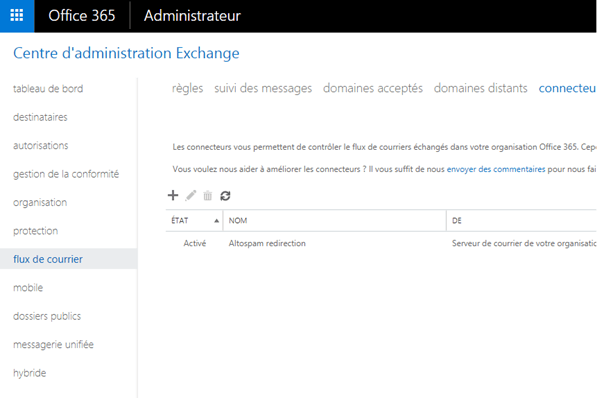 Click on “+” , to create a new connector, then select: “From: Your organization’s mail server”, and “To: Office 365” . Give the connector a name: “Altospam”. Then select verification by IP address.
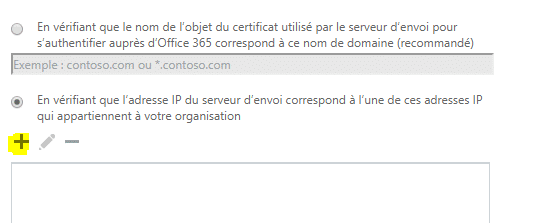 Clicking on the “+”, add the IPs of the Altospam servers one after the other (those you had already whitelisted in step 2).
Microsoft asks you to make changes to your DNS zone in order to set up an SPF as follows: “v=spf1 include:spf.protection.outlook.com -all”. Please note that the “-all” means that anything that does not come from 365 must be rejected. If you’re in the process of migrating, don’t forget to add your mail servers. What’s more, if other servers or equipment (web server, fax machine, etc.) are sending emails on your behalf, don’t forget to add them.
If emails are still arriving in junk mail (internal emails, for example), Microsoft has provided us with a PowerShell solution to disable Office 365 protection in depth.
Log on to PowerShell from your PC as Administrator (search for “Windows PowerShell” ), then run the following command:
Set-ExecutionPolicy Unrestricted
Answer “yes” to all questions. Then issue the command
$UserCredential = Get-Credential
Enter your Office 365 Admin ID and password, then run :
$Session = New-PSSession -ConfigurationName Microsoft.Exchange -ConnectionUri https://outlook.office365.com/powershell-liveid/ -Credential $UserCredential -Authentication Basic -AllowRedirection

Import-PSSession $Session

Get-mailbox | Set-MailboxJunkEmailConfiguration -enabled $false
You have just deactivated 365’s spam filters. If required, you can restrict the execution strategy again:
Set-ExecutionPolicy Restricted
Test Altospam’s solutions!
Thousands of companies, CTOs, CIOs, CISOs and IT managers already trust us to protect their e-mail against phishing, spear phishing, ransomware, …